You'll need to create a record for each stock item that you want to keep track of in Sage 200. You can do this for physical items that you keep in stock and also for items that you order direct from your suppliers, services, and time or labour you want include on customer invoices.
What's in a stock item
Each stock item has a unique code and name. We recommend that you consider the code that you use for your stock items carefully. By default the code is used on sales invoices and orders and purchase orders but you can choose to use or a longer item description or the suppliers part number / reference if you wish.
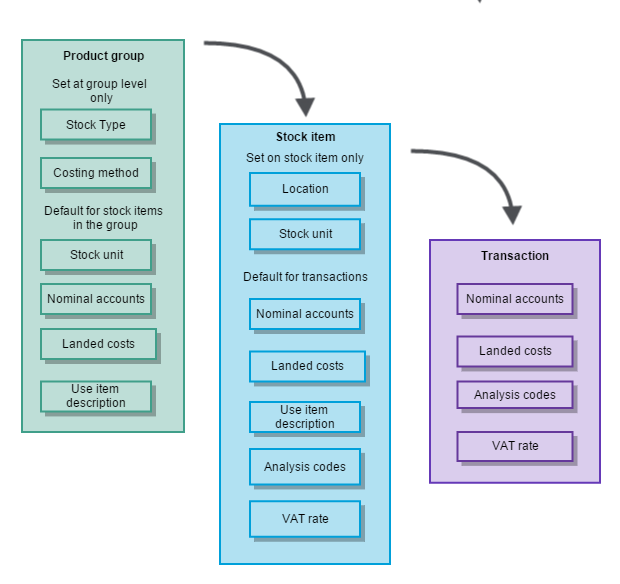
Each stock item has default settings that are used each time the item is bought or sold. Some of these are inherited from the product group and some are set on each item.
Decisions to make about your stock items
You enter information about your stock items across several tabs. You can't save a stock item unless it has a Code, Name, Product Group and Location. Any defaults that are inherited from the product group are entered automatically. Everything else is optional.
Location
This is important as the stock location is used by Sage 200 throughout the sales and purchase process.
You have to choose a location for all your stock items, even if they're Service/Labour type items. If you don't want to record your stock items in different locations, you can use the default HOME warehouse we've already set up for you.
If you do want to record stock in various locations, you have set up your warehouses first. Once you've set up your warehouses, you can use Sage 200 to keep track of the amount of stock you have in each warehouse and bin (if using).
Tip: You can't save a stock item without location (warehouse). If you don't know the location you can still save the item but Sage 200 makes it Inactive. You'll have to enter a location and make the item Active before you can use it.
A bin is an area within a warehouse.
Every warehouse has a single bin created by default called Unspecified. If you don't want to use bins with your warehouses, all items are stored in the Unspecified bin.
If your stock items are stored in more than one place in a warehouse, then you add the required bins on the stock record. You can rename the Unspecified bin to something more meaningful for your company.
If your stock is stored in more than one bin in a warehouse, you can choose which bin, stock is allocated from first. You can set this to allocate by:
-
Bin with the smallest quantity of free stock first.
-
Bin with the largest quantity of free stock first.
-
By bin priority. This is set on the bin and orders are allocated from the bin with lowest priority number first. The allocation priority is set as a number 1 to 9. Bins are set to the lowest priority (9) by default.
When you link a stock item to a warehouse or a bin, you can set stocking levels for the item in that warehouse.
If you set a re-order level of more than 1 and a preferred supplier, you can use the Generate orders screen to automatically create a purchase order when the number in stock is less than the re-order level. This will suggest a quantity to purchase which will make up the stock level up to the reorder level set here.
When a purchase order or stock adjustment will mean that your stock levels will go above or below the minimum or maximum set, you 'll see a warning message but you can still process it.
Default VAT rate
You can set a VAT rate to be used by default each time the item is entered on a sales invoice, sales order or purchase order. If you don't change it here, the standard VAT rate will be used automatically.
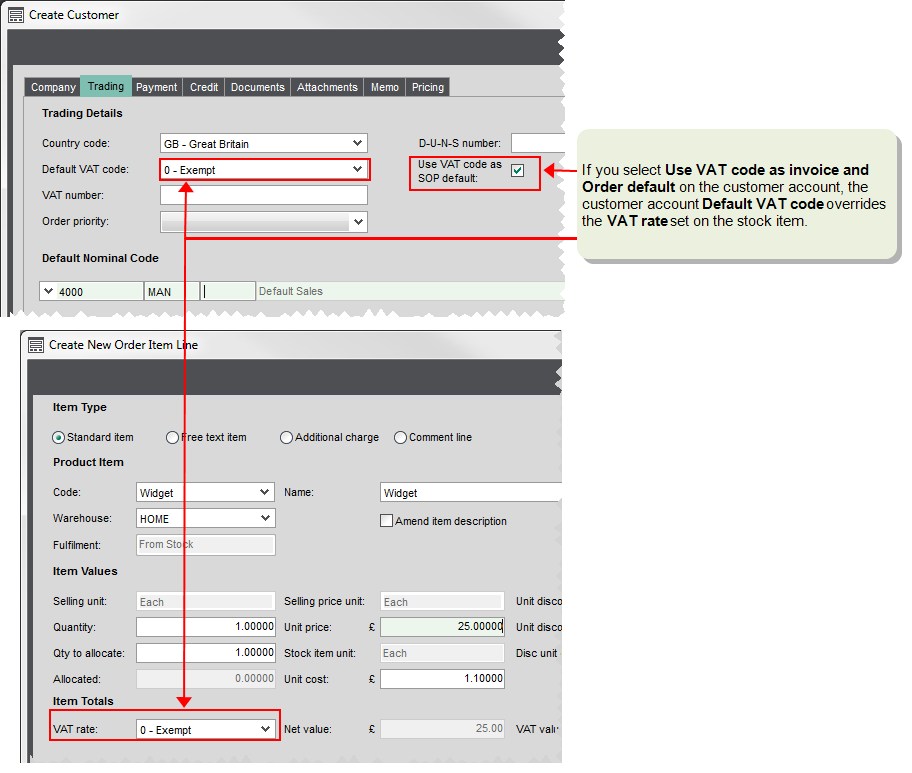
When you add a stock item to a sales or order or invoice in Sage 200, the VAT rate used is the one that is set on the stock item. This is to make sure that the correct VAT rate is applied for the item that you're selling.
However there may be occasions where your customer uses a different VAT rate, for example, if they are a charity and don't pay VAT. In this case, you generally need to use the VAT rate set on the customer account. To do this:
- Select Use VAT code as invoice and Order default on the customer account. This makes sure that the VAT rate (Default VAT code) on the customer account overrides the VAT rate set on the stock item.
For foreign currency customer accounts, this is automatically selected when the customer's Country Code is set to anything other than GB.
You have a stock item for widgets which uses the standard VAT rate by default.
You sell the item to a customer who is a registered charity, so they don't pat VAT. To make sure that VAT is not added to orders for this customer, you set the customer account to reflect this.
Item status
When a stock items is marked as Inactive, it doesn't appear on your stock item lists, so it can't be included on sales invoices, sales orders or purchase orders. It's a good idea to use this for stock items that you don't sell any more or don't want to sell for a temporary period, as it prevents them from being added to invoices and orders by mistake.
The status of all items (Active and Inactive) can be changed using the Amend stock item details screen.
Tip: If you can't find an item in a list, it's a good idea to check its status. Remember, if you save a stock item without a location, Sage 200 makes it Inactive automatically.
You cannot make a stock item Inactive when the item is:
-
On a Live purchase order or purchase return.
-
On a Live sales order or sales return.
-
Allocated.
-
Part of a BOM.
-
A cross-selling item for another stock item.
Item description or Part No
When stock items are added to invoices and orders, the Code and Name that you've given to the item is used on printed documents that are sent to customers and suppliers. Depending on the coding system you've used, there may be occasions where this is not sufficient.
Sage 200 has three alternative options that you can use:
You can enter a longer description of the item here. If you select Use Item description on order and invoices, this description is used on printed documents instead of your the stock item Name.
The Use the item description ... option can be set by default on the product group. You can change this on individual items.
Tip: If this is selected on your stock item, you won't be able to save the item until you've entered a description.
This allows you use an alternative code on your purchase orders. This could be a code or part number used by your supplier. Once entered, the Part No is used instead of the Code on printed purchase orders.
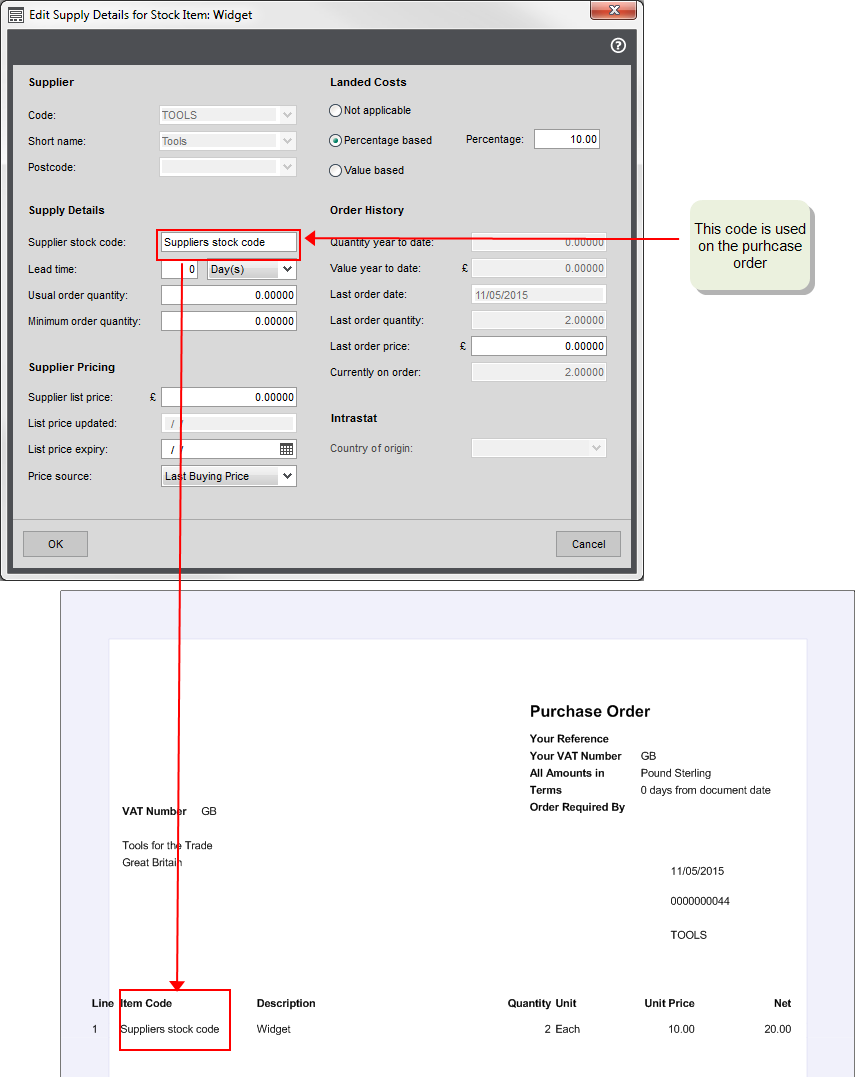
If you link the item to a supplier account and you enter and Supplier stock code, this is used on the printed purchase order rather than the item's code. See the Suppliers section below.
Stock take cycle
Use this to specify how often (in days) you want to do a stocktake for this item. You then use the Stocktake required report to see stock items due for stocktake. The report lists stock items, their stocktake cycle and the date of the last stocktake for each item.
Stock items assembled from other stock items (BOM)
If the stock item is a finished item, i.e. made up from other stock items, you can create a Bill of Materials (BOM) for it. This is a record of the items required to assemble it. You can also check whether you have enough items in stock to assemble the item and record when item has been built so your stock levels are adjusted.
If you want to create a Bill of Materials for this item, make sure you select Built Item on the Details tab.
Bar codes
If you use bar codes for your stock items, you record the bar code on the stock record (Details tab) to make stock identification easier.
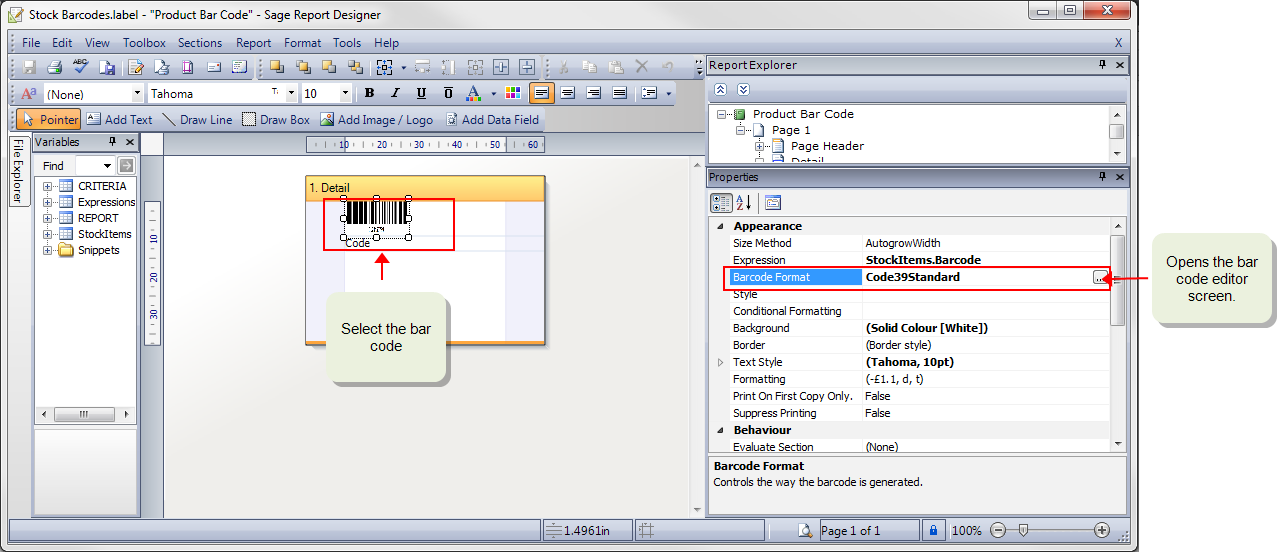
Once recorded, you can print bar code labels for your stock items from Sage 200 (Stock Control > Reports > Catalogue > Stock Bar code Labels). Bar codes are printed in Code 39 format. If you use a different format you can change this in Report Designer.
-
Open the labels in Report Designer.
To do this, either:
-
View the report on screen and click Edit.
-
Open:
 Tools > Run Sage Report Designer, then open Default > Labels > Stock Bar Codes label.
-
-
Select the bar code.
-
In the Properties pane, select Bar code Format and click
 .
. -
Choose the required bar code format and click OK.
-
To save the label file:
-
Go to File > Save As:
-
Save in the Custom > Labels folder.
-
Analysis codes
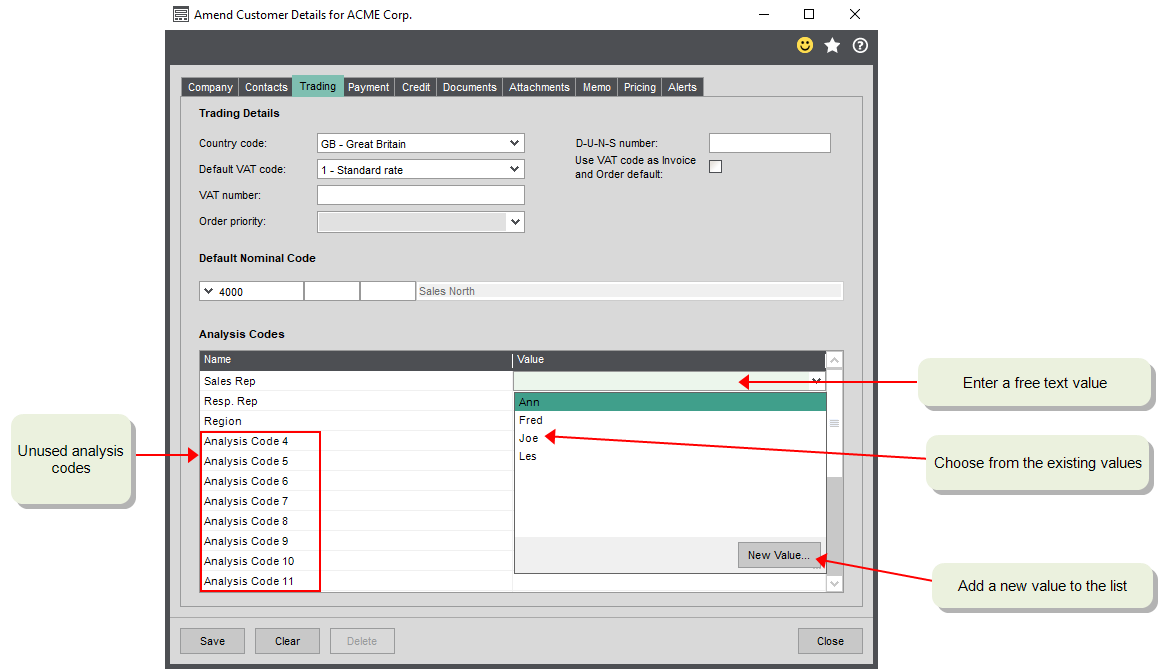
For your stock items, you can use analysis codes as a way of classifying your stock items so that you distinguish between them.
For example, you could use analysis codes to record the commodity code of a stock item. Although the stock item record has a commodity code option, this is specifically designed to be used for the commodity code used on an Intrastat declarations. Analysis codes are a good way of adding other commodity codes such as the ones used for export documents.
Another example where you use the codes to distinguish how they are stored. If you keep some items in ambient storage and others in a cold store, you use analysis codes to distinguish between these items. You could then run reports to make sure that you cold store items are located in your cold store warehouse.
Nominal accounts
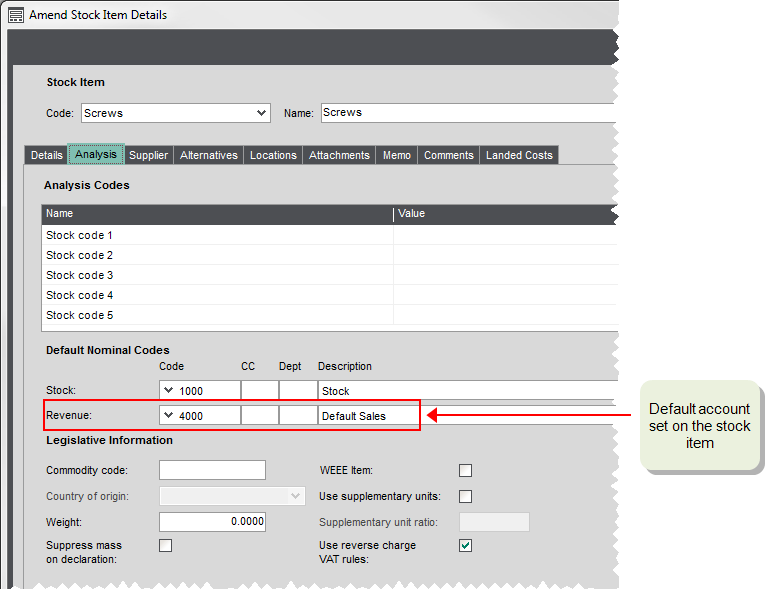
You set the nominal accounts that you want to use by default for the stock item here. When you create a stock item, these are inherited from the product group. You can override these on invoices and orders but entering a default here helps to make sure that transactions are posted correctly.
You specify two default nominal accounts:
-
Stock
Used to record the value of the stock you have bought. By default, Sage 200 uses the Stock account on the Balance Sheet, specified in the Default Nominal Accounts.
-
Revenue
Used to record the value of stock sold. This would normally be an Income account on the Profit and Loss. By default Sage 200 uses the Sales account specified in the Default Nominal Accounts.
How the nominal accounts are used
When you add a stock item to a purchase order, the Stock nominal account set on the stock item is selected by default. When you post the purchase invoice for the order, the value of the each line (item) on the order is posted to this nominal account specified on the line. This uses the cost price of the stock item when it was received multiplied by the number of stock items on the invoice. This also applies to returns and credit notes.
If the invoiced price of the item is different to price when the goods were received, then the difference is posted to the Cost Differences nominal account specified in the Purchase Order settings.
You enter a purchase order for 10 widgets. The cost price of the widgets is £1 each, so the order value is £10. You receive the widgets from your supplier and record this in Sage 200.
When you receive the invoice for the widgets, the price charged by the supplier has changed to £3.
The value of the invoice is therefore £30. When you record the invoice, the values are posted to the following nominal accounts by default:
| Account | Value |
|---|---|
| Stock account | 10 |
| PO Cost Difference Account | 20 |
When you add a stock item to an invoice or sales order, the Revenue nominal account set on the stock item is selected by default. When you post the invoice, the value of the each line (item) on the invoice is posted to this nominal account specified on the line.
This also applies to returns and credit notes.
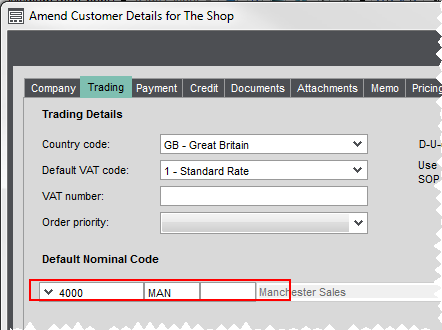
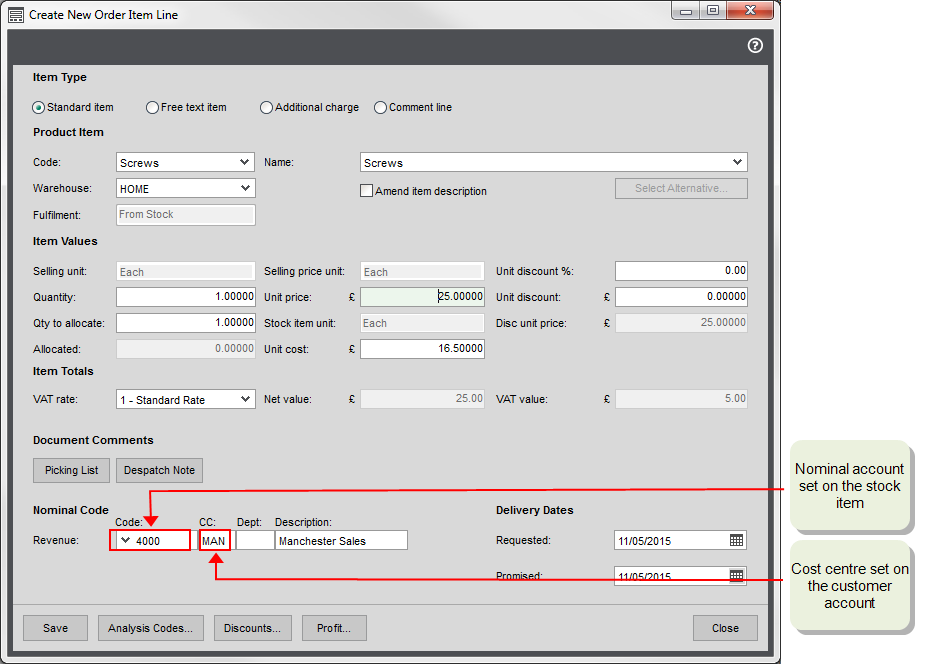
When choosing the nominal account to use by default on invoice and order lines, Sage 200 looks at the default nominal account assigned to the stock item and the cost centre and/ or department (if used) set on the customer or supplier account. For example, if you've set a default nominal account of 4000 MAN on a customer account and a default nominal account of 4001 of a stock item, your 4001 MAN is entered on the invoice or order line, by default.
Note: When using cost centres and departments with your customer and supplier accounts, you must make sure that you create nominal accounts with all the required cost centre and department combinations. If a nominal account doesn't exist, then the line value is posted to the suspense account.
John has a business that sells some goods and some services. He wants to make sure that he records these sales separately in his nominal accounts. Ho also uses cost centres with his nominal accounts to record sales for each of his branch offices. To do this, he has a default Sales nominal account of 4000 and a nominal account for services 4001. He then sets up additional nominal accounts for Sales and Services for each cost centre London LON, Birmingham BIR, and Manchester MAN.
To make sure his sales are recorded correctly for each branch, each customer account is set to the default sales nominal account with their branch cost centre. So a customer of the Manchester office would have a default nominal account 4000 MAN.
To make sure his products and services sales are recorded correctly, his product groups use different default Revenue accounts depending one whether they are Stock(4000) or Service (4001) type groups. These default nominal accounts are then inherited by stock items in the group. As John doesn't want to use further separate nominal accounts, he keeps these defaults for his stock items.
When he enters an order for a stock item for a customer in the Manchester office, the nominal account used on the order line defaults to a combination of the nominal account from the item and the cost centre from the customer in this case 4000 MAN. In the same way an order line for a service item defaults to the 4001 MAN nominal account.
In this example, if John hasn't created the 4000 MAN or 4001 MAN nominal accounts, the order line value will post to the suspense account.
Note: The same rules apply to purchases. A purchase order line will post by default to the Stock nominal account set on the item with the cost centre and/or department set on the supplier account.
Suppliers
Use this to record the suppliers of this stock item.
You can specify a preferred supplier for an item. By default this is the first supplier on the list. The preferred supplier details are suggested when you create purchase orders using Generate Orders.
When you set up a supplier for the stock item, this lets you:
-
Create purchase orders to directly fulfil a sales order (back to back orders).
-
Set Re-order levels. This allows you to use the Generate Orders option to automatically create purchase orders when the stock level is below the re-order level.
-
Use the Suppliers stock code on printed purchase orders rather than the item code.
Once entered, this overrides the Code and/or Part No and is printed on purchase orders for this supplier.
-
See a detailed order history for the item.
-
Specify a List price and choose the price to use when the item is bought from the supplier. Once set, this price overrides the cost price on the item.
You do this by setting the Price Source. This can be a List price or the last price you paid (Last buying Price).
-
Specify the landed costs to use when the item is bought from this supplier.
Once entered this overrides the default landed costs entered on the stock item.
-
Choose the Country of Origin for the item for your Intrastat declaration.
Tip: You can display the Country of Origin Code and Country of Origin Name in the Stock List, by adding columns Info > Country of Origin Code/Name. So if you need to produce reports such as Intrastat that require country of origin (CoO) details, this can help you check the country details that you've entered for your stock items.
Alternatives
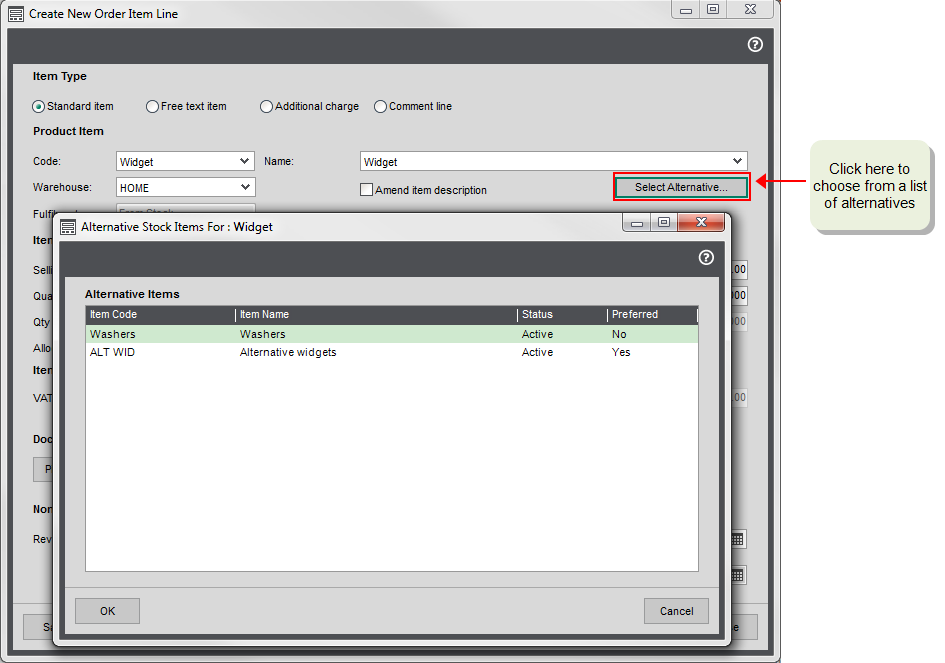
Use this if you want to suggest an alternative item when this item is out of stock. When the person sees the item is out of stock, they can choose from one of the alternatives you've set up here.
You don't have to set up alternatives, and can just leave this blank if you don't want to use it.
If you set up alternatives, you'll be able to select one of the alternatives when you add a standard stock item to a sales order, quotation, or purchase order. If there's more than one alternative, you can set one as the preferred alternative.
Note: Alternatives can't be specified on Invoices (from Invoicing).
Your alternative items must be of the same type, for example you can't use a Service/Labour type item as an alternative for a Stock type item.
Cross-selling
Set up cross-selling items if you want to display complimentary items when you add an item to a sales order. For example, if you sell a printer, you might want to show print cartridges or cables for that printer.
-
To add cross-selling items for a stock item, amend the stock item and use the Cross-selling tab.
Attachments and memos
You can link files and documents with a stock item record. This could be a picture or image of the stock item or any other related document.
You can also add internal notes about a stock item in the form of Memos. These can't be printed on documents. When memos are not no longer valid you either delete them or mark them as Inactive, in case you want to keep a record of the text.
Comments
These can be printed on picking lists and despatch notes. Once entered here, the comments are used by default on all picking lists or despatch notes for the stock item.
You can change the comments on individual invoices and orders if you need to.
Landed costs
You can set the default landed costs to be used for this stock item here. If you don't change them, the defaults entered on the product group are used. Choose whether to charge as a set amount or as a percentage. This can be changed on purchase orders as required.
If you change this after you've entered purchase orders for this item, you existing orders won't be affected.
Stock item alerts
You can set up alerts for a stock item, to show messages whenever you deal with that stock item.
When you set up a stock alert, you can choose to show the alert with particular activities, such as when you enter an order or return, or send and receive goods. You can also choose to display the alert when dealing with particular customers or suppliers.
Alerts can be displayed for the stock item when you enter sales orders, quotations, pro formas, returns, confirm and amend goods despatched, enter invoices and credit notes, enter purchase orders and returns, confirm and amend goods received, and generate purchase orders.
Alerts are displayed for these activities in both the Sage 200 desktop and Web Portal (where available).
See Stock item alerts.
Opening balances
If you're moving from another system, and you want Sage 200 to keep track of your stock items and their value, then you'll need to enter an opening balance for each item. This updates the quantity in stock and updates your buying price (used to value your stock). You enter the balance for each warehouse and bin (if the item's stored in more than one).
You don't have to do this for all stock items in one go, although you can only enter the a balance for each warehouse and bin, once. Doing this doesn't post any values to your nominal accounts, as this will have been included in your opening trial balance, if you've entered one.
If you've already got a list of your current stock levels, on an Excel spreadsheet for example, you can import your stock opening balances from a CSV file. See Import stock opening balances.
Are you ready to perform these actions?
Have you completed the necessary set up so that you can create your stock items? Before you can create stock items, you need to
What do you want to do
Open: Stock Control > Stock records > Enter new stock item
Open: Stock Control > Stock records > Amend stock item details
You can duplicate an existing stock item to copy its details to a new stock item. This is useful if you have stock items that are very similar.
Note: Duplicating a stock item does not copy stock movement details from the existing item.
Open: Stock Control > Stock records > Enter New Stock Item
-
Enter the new stock item's Code and Name, and select its Product Group.
-
Click Duplicate.
-
Select the stock item Code that you want to copy details from.
-
To check the details of the item you're copying, click View Detail.
-
If you can't see a stock item, you might have set its Current Status to Inactive. You can amend the stock item to change its status.
-
-
Choose which details to copy from the original stock item.
-
To copy all the stock item details, select Duplicate all details.
-
To choose which details to copy, select Duplicate basic details, plus.
Basic details are always copied, including settings on the Details tab, Analysis tab, and Comments tab.
You can choose to copy:
-
Memos.
-
Supplier details.
-
Attachments.
-
Locations.
-
Alternative items.
-
Cross-selling items.
-
Alerts (stock item alerts).
-
-
-
Click OK to copy these details to your new stock item.
-
Continue to set up your new stock item.
If applicable, click Selling Prices to edit the stock item price.
-
To save the stock item, select Save.
You can do this in two ways:
Open: Stock Control > Stock records > Amend stock item details | Location
Open: Stock Control > Stock records > Stock Locations
You can do this in two ways:
Open: Stock Control > Stock records > Amend stock item details | Supplier
Open: Stock Control > Stock records > Stock Item Suppliers
Open: Settings > Organisation and financial > Analysis Codes
Open: Settings > Opening Balances > Opening balances at locations
Open: Settings > Stock > Import Opening Balances
Open: Stock Control > Stock records > Amend stock item details | Cross-selling
Open: Stock Control > Stock records > Amend stock item details | Alerts
See Stock item alerts.

